
Third Battle of Ypres: Understanding Passchendaele Beyond the Mud
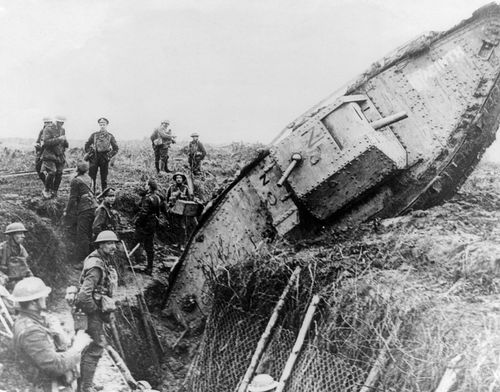
↓ Plan a private visit to the Passchendaele battlefield
The Third Battle of Ypres, better known as Passchendaele, was not one battle fought in one day. It was a campaign of linked operations fought from 31 July to 10 November 1917 across the ridges east and north-east of Ypres. Its name has become shorthand for mud, shell holes and apparent futility, but that memory can obscure what commanders were trying to achieve, why some phases succeeded, why others failed, and why the ground itself mattered so much.
To understand Passchendaele properly, it helps to stop imagining one continuous charge towards a village. The campaign moved in stages. British, French, Australian, New Zealand and later Canadian troops attacked different parts of a German defensive system that had been developed in depth. Some operations, especially the Menin Road, Polygon Wood and Broodseinde battles, gained their objectives with carefully controlled advances. Others, particularly Poelcappelle and the First Battle of Passchendaele in October, became disasters when deteriorating weather, exhausted troops, damaged routes and strong German defences combined.
Third Battle of Ypres key facts
- Dates: 31 July to 10 November 1917.
- Common name: Passchendaele, after the village on the final ridge.
- Main purpose: take the ridges east of Ypres and create conditions for a wider advance in Flanders.
- Major phases: Pilckem Ridge, Langemarck, Menin Road, Polygon Wood, Broodseinde, Poelcappelle, First Passchendaele and Second Passchendaele.
- National importance: especially significant in Australian, New Zealand and Canadian military memory.
- Final result: Passchendaele village was taken by Canadian troops on 6 November; the offensive ended on 10 November.
Why fight another major battle around Ypres in 1917?
Ypres had been a problem for the British Army since 1914. The town sat inside a salient, a bulge in the Allied front that projected eastward into German-held territory. German positions stood on much of the higher ground around it. From ridges near Passchendaele, Broodseinde and Gheluvelt, German observers could watch movement behind parts of the Allied front and direct artillery fire onto roads, tracks, camps and gun positions.
Field Marshal Sir Douglas Haig wanted to improve that situation by driving the Germans off the ridges. His wider ambitions went further. A successful breakthrough in Flanders might eventually open the way towards the Belgian coast and threaten German-held ports connected with the U-boat campaign. That strategic vision was ambitious, and historians continue to debate how realistic the coastal objective was once the battle became a grinding series of limited advances.
The campaign also has to be understood in the wider context of 1917. The French Army had been badly strained after the Nivelle Offensive and subsequent mutinies. Britain was carrying a larger share of offensive operations on the Western Front. Earlier British fighting around Arras had produced tactical successes without a decisive breakthrough. Haig still believed that pressure in Flanders could damage the German Army and improve the Allied position.
The ground: why a few metres of height mattered
The Ypres countryside looks gentle today. That can make the military geography difficult to read. The ridges are not mountains. In many places the difference in height is measured in only a few tens of metres. Yet on a battlefield dominated by artillery, observation and machine-gun fire, those small rises mattered enormously.
Passchendaele ridge forms part of the higher ground east of Ypres. Other important features include the Gheluvelt Plateau, Polygon Wood, Broodseinde Ridge and the spurs running westward from the main ridge. Whoever controlled them could observe movement across lower ground. That is why places such as Tyne Cot, Polygon Wood and Passendale village make more sense when you stop and look back towards Ypres. The strategic value is in the view.
The low ground between the ridges was drained farmland. It depended on ditches, channels and maintained drainage. Years of shellfire had damaged that system. Huge bombardments broke the surface further. When persistent rain arrived, water accumulated in shell holes and churned soil. The famous mud was therefore not simply “because it rained”. Rain fell onto an already devastated, poorly drained battlefield carrying thousands of men, horses, guns, wagons and ammunition columns.
Messines was the successful prelude
Before the main Ypres offensive, the British attacked Messines Ridge south of Ypres on 7 June 1917. Nineteen large mines were detonated beneath German positions at the opening of the battle. British, Australian and New Zealand troops captured the ridge in a carefully prepared operation.
Messines mattered because it removed a dangerous German-held height from the southern side of the Salient and improved the British starting position. It also demonstrated what detailed preparation, limited objectives and overwhelming artillery could achieve. The difficulty was translating that success into a much larger campaign farther north and east.
German defence in depth: more than a front trench
By 1917 the German defence around Ypres was not simply one continuous trench that could be captured and left behind. Positions were organised in depth. Concrete pillboxes provided shelter from bombardment and strongpoints for machine guns. Defensive zones, reserve positions and counter-attack forces were intended to absorb an assault and then strike troops that had advanced beyond their artillery support.
This is one reason the surviving German blockhouses at Tyne Cot are so valuable. They show the physical problem facing attacking infantry. A pillbox could survive shelling that destroyed ordinary trenches. Once the barrage moved forward, machine-gunners could emerge and fire across open ground unless infantry, artillery and specialist weapons dealt with the position quickly.
31 July: the Battle of Pilckem Ridge
The main offensive opened on 31 July after a major preliminary bombardment. British and French forces attacked on a broad front. There were real gains. Pilckem Ridge and other objectives were taken in parts of the battlefield, and the opening day was not simply an immediate collapse into mud.
But the offensive did not produce the breakthrough Haig wanted. German resistance remained strong, and rain began to affect movement. The further troops advanced, the more difficult it became to move artillery, ammunition, food, water and reinforcements forward across ground that had been repeatedly shelled.
This logistical problem is central to understanding Third Ypres. Infantry might capture a position in hours. Turning that captured shell-crater landscape into a defensible front, bringing guns forward and creating reliable routes could take far longer. Every damaged track became important. Pack animals, carrying parties and engineers worked under shellfire to keep the offensive functioning.
August: Langemarck and the campaign loses momentum
Fighting continued through August. The Battle of Langemarck on 16–18 August produced limited gains at heavy cost. The weather and battlefield conditions made artillery preparation less reliable and movement increasingly difficult.
This phase matters because it challenges the idea of Passchendaele as one unchanging battle. The offensive had already begun to stall before the famous October mud. Commanders had to decide whether to continue with broad attacks or alter the method.
For visitors, the northern battlefield around Langemark also introduces a different remembrance landscape. Langemark German Military Cemetery contains German dead from the wider Ypres fighting and offers a striking contrast with Commonwealth cemeteries. It is useful not as a visual comparison of “dark versus white stones”, but as a way to discuss how different countries developed different systems of burial and remembrance after the war.
September: Plumer's limited-objective method
In September, General Sir Herbert Plumer's Second Army took a larger role. The method became more deliberate: attack a limited depth, use concentrated artillery, take the objective, consolidate it, bring artillery forward and only then attack again. This is often described as “bite and hold”.
The important point is not the slogan but the logic. German counter-attacks were dangerous when Allied infantry had pushed too far ahead of supporting guns. A shorter advance allowed the attackers to remain beneath a stronger artillery umbrella and to prepare defensive positions before German reserves struck back.
20 September: Menin Road
The Battle of the Menin Road Ridge began on 20 September. The attack was carefully prepared and achieved many of its objectives. Rather than chasing a distant breakthrough, the assault aimed to seize defined pieces of ground and defeat German counter-attacks with artillery.
This phase is important because it shows that Third Ypres was not an uninterrupted sequence of failed attacks. Tactical adaptation could work. The battlefield remained costly, but the British and Dominion armies were learning how to combine infantry, artillery and consolidation more effectively.
26 September: Polygon Wood
Polygon Wood became strongly associated with Australian troops. The battle beginning on 26 September was another limited-objective attack and is often remembered as one of the more successful operations of the campaign.
Today the landscape around Polygon Wood is especially useful for understanding the Australian experience. Buttes New British Cemetery, the Australian memorial on the Butte and the New Zealand memorial nearby connect battlefield geography with post-war commemoration. The restored woodland can make the place appear peaceful and enclosed, but in 1917 the area had been shattered by shellfire.
4 October: Broodseinde, success before the weather turns
On 4 October British, Australian and New Zealand forces attacked at Broodseinde. The operation captured important high ground and inflicted heavy losses. Australian troops reached positions around the ridge where Tyne Cot Cemetery now stands. Several German concrete positions taken during this fighting survive inside the cemetery.
For the New Zealand Division, the attack on Gravenstafel Spur was successful but costly. New Zealand history records several hundred deaths during the operation and its aftermath. Eight days later the same division would face a very different situation.
Broodseinde is the hinge of the campaign. At this moment, the limited-objective system appeared to be working and the ridge seemed increasingly vulnerable. It was tempting to believe that German resistance might be close to breaking. That conclusion would prove dangerously optimistic.
9 October: Poelcappelle
Rain returned and battlefield conditions deteriorated. On 9 October another attack went forward around Poelcappelle. Troops struggled through mud, artillery support became harder to coordinate and many German positions remained effective.
The practical consequence of the mud is often described too vaguely. Soldiers did not simply get dirty. Men carrying heavy equipment used enormous energy to move short distances. Stretcher-bearers could need hours to evacuate a casualty. Pack animals and vehicles left tracks and sank. Guns could not always be moved into the positions needed to support the next attack. Shell holes filled with water and could become lethal traps for wounded or exhausted men.
12 October: First Battle of Passchendaele and New Zealand's blackest day
Three days after Poelcappelle, another attack was ordered for 12 October. New Zealand and Australian troops were among those sent forward towards the Passchendaele ridge. The preparation was inadequate for the conditions. Barbed wire remained intact in important sectors. The artillery barrage was less effective because guns and ammunition had been difficult to move over the devastated ground.
The New Zealand Division attacked Bellevue Spur. Troops encountered strong wire and machine-gun fire. Many could not get through. The advance stalled around the opening positions, leaving wounded men exposed in shell holes and mud.
New Zealand's official historical resources describe 12 October as the country's “blackest day”. About 2,700 New Zealand casualties were suffered in the attack, and 843 men are officially listed as dying on 12 October, with others dying of wounds later. The scale becomes more personal at Tyne Cot, where New Zealand missing from the Ypres fighting are commemorated. NZ History identifies several sets of brothers among the missing, including the Newlove family, whose three sons Charles, Edwin and Leslie were killed in the October fighting.
The story is often told only as a lesson in mud. That is incomplete. The failure came from several interacting problems: exhausted formations, difficult artillery preparation, wire that had not been adequately cut, strong German positions, the physical state of the battlefield and pressure to continue an offensive whose previous attack had already failed.
Why the Australians and New Zealanders could not simply continue
By mid-October the formations used in the September and early October battles were worn down. The Australian War Memorial records roughly 38,000 Australian casualties during eight weeks of fighting associated with Third Ypres. The New Zealand Division had suffered heavily at Broodseinde and catastrophically on 12 October.
Continuing required fresh troops, renewed artillery preparation and another approach. The Canadian Corps was brought into the Passchendaele sector for the final phase.
The Canadian Corps arrives
Lieutenant-General Arthur Currie, commander of the Canadian Corps, was not enthusiastic about the operation. The battlefield presented exactly the problems Canadian staff officers feared: poor roads, waterlogged ground, exhausted infrastructure and strong defences. The Canadians nevertheless prepared methodically.
Engineers and labour units worked on roads, duckboards and routes. Guns and ammunition had to be brought forward. Positions were reconnoitred. The Canadian plan divided the advance into a series of limited attacks rather than one attempt to rush straight into the village.
26 and 30 October: the Canadian advance begins
The Canadian offensive began on 26 October. Progress was slow and costly. Troops moved between shell holes under artillery and machine-gun fire. A second attack on 30 October pushed closer to Passchendaele.
Individual actions became important because small strongpoints could hold up an entire battalion. Veterans Affairs Canada notes nine Victoria Crosses connected with the Canadian fighting at Passchendaele. Major George Pearkes, for example, continued to lead despite being wounded and helped secure a key position against counter-attacks.
The Canadian experience also included Indigenous soldiers such as Francis Pegahmagabow of the 1st Battalion. At Passchendaele he worked as a messenger and maintained contact with neighbouring units under dangerous conditions, earning a bar to his Military Medal. Stories like his show that the battle depended on communication and movement as much as on the men in the first assault wave.
6 November: Passchendaele village is captured
On 6 November Canadian and British troops attacked the ruined village and surrounding ridge. The 27th Battalion, City of Winnipeg, was among the units that entered and passed through Passchendaele. The place they captured was no longer an intact Flemish village. Shellfire had reduced buildings to ruins and churned the surrounding fields.
The Canadian advance continued with a final operation on 10 November to secure more of the ridge. That date is generally used as the end of the Third Battle of Ypres.
Veterans Affairs Canada records more than 4,000 Canadian dead and almost 12,000 wounded in the Passchendaele fighting. Those losses explain why the battle has such a strong place in Canadian memory alongside Vimy Ridge, Hill 70 and the Hundred Days.
Canadian Passchendaele Story
Follow the Canadian advance to Passchendaele
Stand on the ground of the final October and November attacks and connect Passchendaele with Tyne Cot, the Canadian Memorial and the wider Ypres battlefield.
Explore the Canadian Flanders Fields Tour
Private Canadian-focused tour from Bruges or Ypres
What did Third Ypres actually achieve?
The most direct tactical result was that the Allies captured the Passchendaele ridge and pushed the front several kilometres eastward. The German Army also suffered severe losses. But the offensive did not achieve the dramatic breakthrough towards the coast envisioned at the beginning.
Casualty totals remain disputed because historians use different date ranges, national records and definitions. The Australian War Memorial gives a combined British and Dominion casualty estimate of about 310,000 for Third Ypres and notes German losses were somewhat lower; other studies produce different figures. It is better to recognise that uncertainty than to present one total as unquestionable.
The strategic verdict remains debated. Supporters of Haig's decision to continue point to pressure placed on the German Army, the need to support wider Allied strategy and the tactical improvements demonstrated in September. Critics emphasise the limited territorial gain, enormous human cost and the decision to continue attacks after conditions deteriorated badly.
Both perspectives are useful on the ground. Passchendaele should neither be reduced to “pointless mud” nor turned into a simple success story. It was a campaign in which tactical adaptation, operational ambition, weather, logistics, artillery and human endurance collided.
The ground was lost again in 1918
One of the hardest facts for visitors is what happened next. During the German offensives of spring 1918, the Allies withdrew from much of the ground won in 1917. Passchendaele returned to German control as the front was shortened. Belgian forces recaptured the village during the Allied advance in September 1918.
This does not mean the 1917 fighting had literally achieved nothing. German divisions had been worn down and tactical lessons were learned. But it does underline the difference between capturing terrain and achieving a durable strategic breakthrough.
How to read the Passchendaele battlefield today
Modern Passendale is rebuilt. The drainage works. Roads cross fields that were once a continuous crater zone. Most trenches have disappeared under agriculture. That makes the surviving anchors particularly important.
Tyne Cot Cemetery stands on ground associated with the Broodseinde fighting. Its German blockhouses show that the cemetery is literally built into the battlefield. From the rear of the cemetery, look west towards Ypres and south-west towards the lower ground. The view explains why holding the ridge mattered.
Polygon Wood tells the Australian and New Zealand story of the September phase. The Butte gives another useful elevated view and demonstrates how even modest rises dominated surrounding terrain.
Passendale village is the final geographical objective. Stand near the church and look west. On a clear day the relationship with Ypres becomes easier to understand. The village itself does not preserve a cratered 1917 landscape, so the value comes from orientation rather than ruins.
Passchendaele New British Cemetery contains more than two thousand First World War burials and commemorations, with a very high proportion of unidentified graves. It was created after the Armistice by concentrating battlefield burials. That makes it a powerful place to discuss what happened to the dead after the fighting ended.
The Passchendaele Canadian Memorial marks Canada's role in the final phase and provides a direct link between the modern landscape and the Canadian Corps' advance.
How Tyne Cot explains the battle better than a casualty statistic
At Tyne Cot, the most important lesson is not simply that it is the largest Commonwealth war cemetery in the world. Look at the unidentified headstones. Look at the memorial panels. Then look at the German concrete beneath the Cross of Sacrifice.
Those three elements tell three different parts of the 1917 story: men fought over fortified ground; many bodies were recovered but could not be identified; many others had no known grave and were commemorated by name. The cemetery is therefore not separate from the battle. It is one of the clearest surviving documents of what the battle did to human bodies and battlefield geography.
A useful way to tell the story on the ground
Rather than starting with four months of dates, begin with one soldier's movement. Imagine an infantryman moving forward from the Ypres area in October 1917. He does not walk across an empty field. He follows duckboards because leaving them can mean sinking into deep mud. Pack animals compete for the same routes. Artillery shells cut tracks that engineers repair again. Runners carry messages when telephone lines are broken. Wounded men move in the opposite direction, often carried by four stretcher-bearers who may need hours to cover a short distance.
Then add the artillery timetable. The infantry must remain close enough to the creeping barrage for German defenders to stay under cover, but not so close that friendly shells hit them. If the mud slows the infantry while the barrage continues according to the clock, the protective wall of shells moves away. German machine-gunners emerge. A few minutes of lost timing can decide whether a strongpoint falls.
This is why the physical landscape matters. Passchendaele was not simply courage versus machine guns. It was a battle of timing, roads, drainage, artillery, observation and exhausted human bodies.
Planning a visit: what belongs together
A good Passchendaele visit should not consist of one photograph at Tyne Cot followed by the village. The campaign becomes much clearer if you connect several phases.
- Start with Ypres: understand the Salient and why troops had to move east from the town.
- Use Polygon Wood: explain the successful September method and the Australian role.
- Use Tyne Cot: explain Broodseinde, German concrete defences, burial and the missing.
- Move towards Passendale: follow the direction of the October attacks and explain how conditions deteriorated.
- Add a Canadian stop: connect the final October-November advance with the capture of the village.
If your main interest is New Zealand, 4 and 12 October deserve separate treatment. If your focus is Australian history, Menin Road, Polygon Wood, Broodseinde and 12 October create the strongest sequence. For Canadian visitors, the final advance from 26 October to 10 November should be given enough time to explain why the Corps was brought in and how it prepared the ground.
Frequently asked questions
Is Passchendaele the same as the Third Battle of Ypres?
Passchendaele is the common name for the wider Third Battle of Ypres campaign. Strictly speaking, Passchendaele was the village and the name of the final October-November battles within that wider campaign.
When did the Third Battle of Ypres take place?
The campaign began on 31 July 1917 and ended on 10 November 1917.
Why was Passchendaele so muddy?
The battlefield lay on low, heavily drained farmland. Years of shelling damaged drainage, major bombardments churned the surface, and persistent rain filled shell holes and saturated routes. The problem was therefore a combination of water, destroyed infrastructure, shellfire and enormous military traffic.
When was Passchendaele village captured?
Canadian and British troops attacked on 6 November 1917, and Canadian units captured and passed through the ruined village. Fighting continued until 10 November to secure more of the ridge.
Why is 12 October 1917 important to New Zealand?
The New Zealand Division's failed attack on Bellevue Spur produced about 2,700 casualties. NZ History records 843 men as dying on 12 October itself, making it New Zealand's deadliest day of the war and one of the darkest days in the country's history.
How important was Passchendaele to Australia?
Australian divisions fought in several major September and October phases, including Menin Road, Polygon Wood, Broodseinde, Poelcappelle and First Passchendaele. The Australian War Memorial records about 38,000 Australian casualties over eight weeks of fighting.
How important was Passchendaele to Canada?
The Canadian Corps took over the final phase, attacking from 26 October and capturing Passchendaele village on 6 November. Veterans Affairs Canada records more than 4,000 Canadian dead and almost 12,000 wounded in the battle.
What are the best places to see the Passchendaele battlefield?
Tyne Cot Cemetery, Polygon Wood, Passendale village, the Passchendaele Canadian Memorial and Passchendaele New British Cemetery are among the most useful sites for understanding the campaign. They make most sense when connected to the wider Ypres Salient rather than visited as isolated memorials.
Historical details on this page were reviewed against current material from the Australian War Memorial, NZ History, Veterans Affairs Canada, the Commonwealth War Graves Commission and the National Army Museum. Casualty estimates for the complete Third Battle of Ypres vary between sources and are therefore identified as estimates rather than presented as one definitive total.

Private Ypres Battlefield Tour
Follow the campaign across the actual ground, from Polygon Wood and Broodseinde to Tyne Cot and Passchendaele, with the Australian, New Zealand and Canadian phases connected into one clear story.
Private tour for your own group. Current seasonal price and availability are shown on the booking page.
Check AvailabilityWritten and reviewed by Niels Declercq, private WW1 battlefield guide based in Bruges.